Wednesday 11 July 2012

Chocolate Yogurt Cake + A Baking Secret


Ever since we started this blog I’ve been dying to try using yogurt in my baking. Yesterday, it was pouring rain in London (not unusual for this summer!) but there is something so comforting about baking when its miserable outside, especially when it is something as decadent as chocolate cake!
 

I had never baked with yogurt before and didn’t really know what to expect but after making probably the moistest and most delicious chocolate cake I’ve ever tasted this will not be the last time!

This cake has such a velvety, ‘melt-in-your-mouth’ texture, with a very subtle but lovely tartness from the yogurt. I dare you to try and have just one piece!
 
Ingredients:
Cake:
6 tbsp. butter (at room temperature **see baking secret below**)
1 ¼ cups granulated sugar
2 eggs
1 ¾ cups white flour
2/3 cups cocoa
1 ½ tsp. baking powder
½ tsp. baking powder
¾ tsp. salt
6 ounce container of rich vanilla yogurt
1/3 cup water
1 tsp vanilla

Glaze:
1 ½ cups powdered sugar
2/3 cup cocoa
2 tbsp .plain yogurt
1-2 tbsp. milk
1 tsp. vanilla


Directions:
 

Pre-heat oven to 350°F. In a large bowl, combine flour, cocoa, baking powder, baking soda and salt. Set aside. Meanwhile, cream butter and sugar until light and fluffy.
 

Add Eggs one at a time and beat until combined.


Add half of flour and cocoa mixture to butter, sugar and eggs. Add yogurt, water and vanilla.
 

Finally, mix in remaining flour and cocoa mixture.
 

Pour batter into a baking dish a bake for 1 hour, or until toothpick comes out clean.  Let cool for 20 minutes.
 

Meanwhile, combine powdered sugar, cocoa, yogurt, milk and vanilla. This should be quite thin as the mixture is meant to be a glaze.
 

Drizzle glaze over cooled cake.


BAKING SECRET!

Have you ever had one of those moments when you want to bake something but you forgot to take butter out of the fridge to make it room temperature? Well, I was watching a cooking program the other day and discovered the simplest way to solve this!


3 Steps:
1.     Place butter between two pieces of parchment paper
2.     Using a rolling pin (or weapon of choice) smash butter until flat
3.     Open paper and refold butter, repeating step 2 until butter is soft

THE Guacamole


First, I must express my guacamole 'pet peeve'. Whoever decided that you should put sour cream in guacamole had no appreciation for the absolute amazing natural richness and buttery-ness that avocados already have! So, I’ve provided a recipe that is of course ‘au natural’. However, if it is your preference and you must add some creamy substance to your guacamole I will reluctantly support the addition of a dollop of Greek yogurt (We are the yogurt sisters after all!) especially if using slightly under-ripe avocados.

Secondly, about three years ago I tasted a guacamole recipe that changed the way I make guacamole (and the way you probably will too) forever! One word: CUMIN. This spice absolutely adds another dimension to the dip, creating a delicious south-western taste!

This recipe is an absolute summer staple. Whenever I make it for my family it is gobbled up in minutes, especially with those delicious lime flavoured tortilla chips!

Ingredients (Serves 3-4)
2 ripe avocados
2 limes juiced
1 small tomato diced
½ redi chilli chopped finely
1 tsp. ground cumin
¼ tsp.  cayenne pepper or chilli poder
Salt and Pepper to taste


Directions

Core and remove inside of avocados into a bowl. Chop and mash avocados to preferred consistency (I like mine quite chunky!). Fold in tomatoes, chillies, spices and salt and pepper


Tuesday 10 July 2012

Fast Focaccia


In a recent effort to try and use up ingredients in the fridge, I noticed (as you often do…) halves of onions and bits of lovely fresh herbs from previous recipes. I thought, what a better way to use up these delicious ingredients than on top of a delicious Focaccia Bread!

As we’ve already pointed out I’m the baking sister… I love to bake and there is just something to be said about that amazing feeling you get when bread rises is there? But, if you’re a bread baking virgin… don’t write this recipe off because this is the perfect place to start!

This recipe I have actually kept from my High School Home Economics class so it’s easy enough for a teenager to make and it can basically be made in under an hour. …And if it doesn’t turn out perfectly there will be more than enough flavour on top to compensate!

As I said, I used this recipe to use up ingredients in the fridge so use your imagination when it comes to the toppings!


Ingredients (Serves 4)
Bread Base:
1 ½ tsp. yeast
1 ½ cup warm water
2 tbsp. olive oil
½ tsp. sugar
2 ½ cups flour (extra for kneading)

Toppings: (suggestion!)
½ onion sliced
4 cloves garlic smashed and sliced
1 tsp. each of Basil/Oregano/Thyme (Double if using fresh herbs)
Coarse Salt
Olive Oil
Parmesan Cheese

Directions
Combine sugar. water, yeast and olive oil. Let sit until yeast begins to bubble to the top. Meanwhile, measure out flour into a large bowl and make a small well in the centre. Pour water mixture into well and, using a fork, incorporate surrounding flour until dough begins to form a ball.

Empty dough and remaining flour onto a clean surface and knead dough for 8-10 minutes until smooth and ‘elasticy’. (Note: incorporate any additional flour only if dough is sticking to your hands)

Pre-heat oven to 375° F. Let dough rise for 15-30 minutes. This recipe does not need to rise for very long to work however that being said, the more you can let the dough rise (like with most bread) the better!


While dough is rising you can prepare the topping! Heat a skillet with a generous amount of olive oil. Add onions and garlic and cook until almost caramelised. If using fresh herbs add to skillet and cook for another 1-2 minutes. Remove from heath and let cool.

After the dough has risen, remove from the bowl and place onto a pan lined with baking paper. Roll into preferred shape (circle or square) until dough is approx. ¾ inch thick. Puncture with a fork so that any air can be released from the bottom while baking and poke bread with finger making small holes. Add onions, garlic and (if using fresh…) herbs, spreading evenly on top of dough. Sprinkle any dry herbs, coarse salt and Parmesan cheese on dough and finally, drizzle with olive oil.


Bake for 20-25 minutes, or until base is golden brown. Enjoy with olive oil and balsamic vinegar. 


Thursday 3 November 2011

Asparagus, Roasted Tomato and Crispy Leek Salad Rolls

How many ways can you use asparagus, leeks and chanterelle mushrooms? Well, if you look at the past couple blog posts you may have guessed I haven't gone grocery shopping in awhile [and why would you when you have such great ingredients sitting in the fridge!].   Ahh the trials and tribulations of a studying maniac, cooking for one.  


I can guarantee this is my last recipe for awhile with these ingredients, because I used up my vege drawer today on these delicious salad rolls - with roasted tomato and garlic salsa, crispy leeks, sauteed asparagus and mushrooms. 


Ingredients:
1) 3 small (but bigger than cherry) sized tomatoes, quartered
2) 1 large clove of garlic, top cut off but not peeled
3) 1/2 leek, thinly sliced
4) 2 tsp olive oil
5) Bunch of asparagus
6) Mushrooms of your choosing
7) 1 tsp butter 
8) 1 cup broth (I used beef because it was in my fridge, but vege or chicken works too)
9) 4 - 5 pieces of rice paper
10) Lettuce
11) Salt and pepper


Directions
1) Preheat the oven to 380.
2) Roast tomatoes with the piece of garlic on top (I used parchment paper on my pan so I didn't use any extra oil - just a little salt and pepper).  
3) Heat olive oil and add leeks on medium-high heat.  Saute until crispy and brown.
4) Remove leeks and add butter to pan.  Add asparagus and mushrooms.
5) Add beef broth and cook until asparagus and mushrooms are tender.
6) Remove asparagus and mushrooms.  Pour remaining beef broth into a small serving bowl.
7) Remove tomatoes and garlic from oven.  Peel and mince garlic.  Chop tomatoes.  Mix garlic and tomatoes together and strain. 
8)Fill a bowl with hot water. 
9) Dip a piece of rice paper in, remove and place on dry towel.  Pat dry.
10) Put rice paper on plate. Place asparagus, tomato salsa, lettuce, mushrooms and crispy leeks along the middle of the rice paper.  
11) Fold in tops of the paper and roll. 
12) Serve with the beef broth.


Monday 31 October 2011

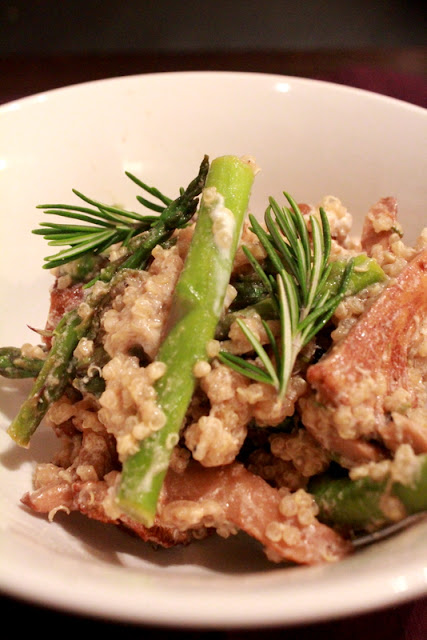
Quinoa Leek and Chanterelle Risotto

I'm in the midst of studying for my bar exams right now.  And I've got to say, enough hours of studying civil litigation and family law really makes a girl hungry!  


After about 15 aimless trips to the fridge ... opening and closing the fridge door ... I finally pulled out what's left of my vegetable drawer: a leek, garlic, asparagus, chanterelle mushrooms and rosemary (I really lucked out with my left over groceries - not a bad place to start!).  And I just started to chop...


...30 minutes later, somehow (because of my studying haze, I still don't exactly know how) this was the result! and it was delicious.  Delicious, practical and fast.  The beautiful thing about this dish is you can really throw whatever you have on hand into it.  


This rich, healthy and creamy quinoa risotto with sauteed leeks, chanterelle mushrooms, rosemary, asparagus and a touch of yogurt to the end to make it extra creamy took away my studying woes [even if just for a few minutes]. 


Ingredients [this serves 1]:
1) Half a leek, sliced
2) Handful of chanterelle mushrooms
3) 6 pieces of asparagus, cut in half
4) 1 clove garlic, minced
5) 1 tsp rosemary, diced finely
6) 3/4 cup of white wine
7) 3/4 cup of beef stock
8) 1/2 cup quinoa and 1 cup water
9) 1/2 cup of non-fat plain greek yogurt
10) Salt and pepper to taste.


Directions:
1) Begin sauteing sliced leeks
2) In a separate pot, bring quinoa and water to a boil.  When it starts to boil, reduce to a simmer until the quinoa has absorbed all the water.
3) When the leeks start to brown, add the garlic and white wine.
4) When the wine starts bubbling up the sides, add the beef stock.
5) Add rosemary, asparagus and chanterelle mushrooms and simmer sauce down on medium heat, while your vegetables cook.  
6) When the sauce is simmered down to about half and the vegetables are tender, add the cooked quinoa. 
7) Stir the quinoa in to soak up all the delicious flavors in the sauce.  Add the yogurt and taste.  Season to taste with S & P.


Sunday 30 October 2011

Prosciutto Frittata Cups - An elegant breakfast in minutes

This beautiful [and tasty!] breakfast is a great way to start your day.  It is hearty, filling, pretty to look at and...fast! This is the make for your fancy brunch or throw together on a wednesday morning while you're in the shower miracle breakfast.  


It takes under 5 minutes to throw these elegant cups together before you put them in the oven.  And the result is pure breakfast joy.  Really.


I copied this breakfast idea from my good friends over at shrpknvs with a couple of yogurt sisters' twists.  Check out their delicious recipe for "Breakfast Nests" - especially for all you poached egg, sunnyside up lovers out there.  


I went the frittata route because I like a little scramble in my eggs, but you can really do anything to make this recipe your own.  Bake the egg whole, or add any other ingredients you like in your omelettes.  I went the simple route with fresh basil, fresh ground pepper and a dollop of greek non-fat yogurt on top.


Ingredients (for 2 breakfast cups):
1) 2 slices of prosciutto
2) 2 medium size eggs
3) 1 tbsp fresh basil (shred with your hands into small pieces)
4) Fresh ground pepper
5) 2 1/2 tsp dollops of greek plain yogurt


Directions:
1) Preheat oven to 375.  In a muffin tin, place prosciutto down to form cups (you might have to cut the prosciutto in half and double layer it - just play around with it!)
2) Whisk together eggs, fresh basil and pepper.  The harder you whisk the better - get it as frothy as possible!
3) Pour egg mixture into the prosciutto cups (I poured too much in this time - you don't want to fill them completely to the top, especially if you add cheese to this recipe because they are going to grow!)
4) Put the muffin tin in the oven for 10 minutes.  Take it out at ten minutes, and put two small yogurt dollops on top of each prosciutto cup.
5) Put back in the oven for 10 minutes.


I love the boys over at shrpknvs' idea to add cheese on the top and broil these at the end.  I'm definitely going to try that next time!


Saturday 29 October 2011

Italian Night: Roasted Chicken with Chanterelle Red Wine Yogurt Sauce

I took an italian cooking class last week with my family and loved it!  We were celebrating my cousin's 17th birthday and we all had a blast.  We also made some amazing food.  


The highlight for me was a chanterelle wine sauce we made with the main course.  We mixed in some heavy cream and parmesan and it was to die for.  Definitely not an every night of the week kind of thing.


But it was so delicious I immediately started thinking of substitutes for the cream.  This is going directly against everything the teacher in the cooking class told us about not substituting milk for cream [because it doesn't have the milk fats to keep the sauce together].  I don't think I can argue that the bacterial cultures in yogurt will work any better to keep the sauce from separating! 


So I decided to try mixing the yogurt with 1 part yogurt and 1 part water. And add it at the very end so it didn't reduce enough to separate.  It worked perfectly - just to add a bit of creamy probiotics and turn this dish into one that you can justify enjoying on a nightly basis.


And voila: easy, healthy and delicious roast chicken with a chanterelle red-wine-yogurt sauce.  Buon Appetito!


Ingredients:
For the Chicken (I got this delicious marinade from the cooking class as well!):
1) Two chicken breasts
2) 1/2 tsp smoked paprika
3) 1/2 tsp rosemary
4) Zest of half a lemon
5) 1 tbsp olive oil
6) Black pepper
7) 2 garlic cloves, minced


For the Sauce:
1) 1 large garlic clove, minced
2) 2 small shallots, chopped
3) Handful of chanterelle mushrooms
4) 2/3 cup of red wine
5) 2/3 cup low sodium beef broth
6) 2 tsp corn starch and 2 tsp cold water, whisked together
7) 1/4 cup yogurt and 1/4 cup warm water, whisked together
8) Olive oil
9) Salt and pepper
10) Asparagus spears, cut in half
11) Gnocchi (I just used store bought - this was a weeknight meal after all!)


Directions:
1) Mix together chicken marinade ingredients. Marinade chicken for an hour or two in the fridge.
2) Preheat oven to 400.
3) Add chicken breasts and cook for 20-25 minutes, depending on how thick they are.  Let the chicken breasts rest for 5 minutes before slicing them.
4) Boil water for gnocchi.  Add gnocchi and cook until gnocchi rises to the top of the pot.  Strain and add some olive oil to keep them from sticking.
5) In the meantime, heat up olive oil in a pan.  Add shallots and garlic on medium-high heat. Add chanterelle mushrooms.
6) Add red wine.  When the red wine starts bubbling along the sides of the pan, add beef broth. 
7) Add asparagus spears and begin reducing.
8) Stir in your corn starch
         *Make sure the corn starch is mixed with equal part cold water, and the 
           sauce is hot when you add it to avoid clumping. 
9) Add yogurt mixture and gnocchi and turn heat down.
10) Season with S & P to taste.


Garnish with rosemary sprigs, serve with a nice bottle of chianti and enjoy your italian evening!